
how to remove stickers from car paint is usually less about brute force and more about controlling heat, choosing the right solvent, and working patiently so you don’t haze the clear coat.
If you’ve ever peeled a decal and ended up with torn vinyl, sticky residue, or a “shadow” that won’t wash off, you already know why this matters. A rushed removal can leave micro-scratches, dull spots, or residue that attracts dirt and looks worse over time.
This guide gives you a practical path: how to tell what you’re dealing with, which tools are safest, and what to do when adhesive fights back. I’ll also flag the common “almost works” mistakes that create more cleanup than they save.
What you’re really removing: vinyl, paper, adhesive, or “ghosting”
Before you grab chemicals, it helps to name the problem. Sticker removal often has two phases: lifting the sticker material, then removing adhesive. Sometimes there’s a third issue that looks like residue but isn’t.
- Vinyl decals: usually peel in larger sheets when warmed, adhesive tends to be stronger.
- Paper stickers: tear easily, leave paper fibers plus glue, often need a different approach.
- Adhesive residue: the sticky film that grabs dust and feels tacky.
- Ghosting or shadowing: a faint outline after removal, often from paint fading around the sticker or adhesive staining the clear coat.
Ghosting is the part that frustrates people because more solvent doesn’t always help. If the surrounding paint has oxidized or faded, the outline may only improve with polishing, and sometimes it won’t fully disappear.
Quick safety check: paint type, temperature, and what to avoid
You can remove stickers safely on most modern clear-coated finishes, but there are a few conditions that raise the risk.
Do this first (takes 60 seconds)
- Work in shade and on a cool panel, hot paint makes chemicals flash too fast and increases marring risk.
- Wash the area so grit doesn’t turn into sandpaper when you wipe.
- Test any remover on a small, hidden spot, especially on repainted panels.
What to avoid
- Metal razor blades on paint, they can catch and cut the clear coat.
- Strong solvents like lacquer thinner, MEK, or harsh “industrial” removers unless a professional recommends them for your paint system.
- Abrasive pads or melamine sponges, they can dull clear coat fast.
According to the U.S. Environmental Protection Agency (EPA), many solvent-based products can release volatile organic compounds (VOCs), so ventilation and following the product label matter, especially in enclosed garages.
Tools and products that work (and when to use each)
If you want clean results, you’ll usually combine heat + safe lifting + adhesive removal + a final protection step.
Core tools most people actually need:
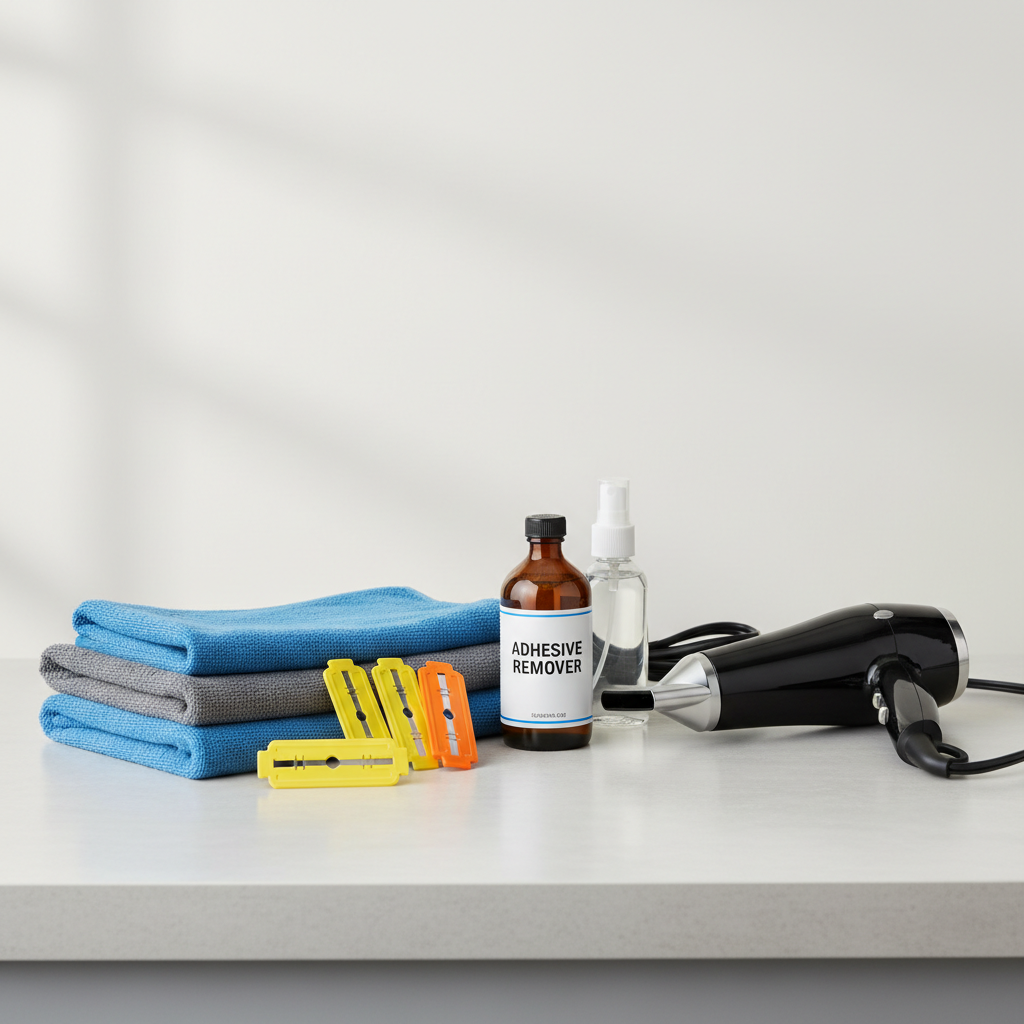
- Hair dryer or heat gun (hair dryer is safer for beginners)
- Plastic razor blades or a plastic scraper
- Microfiber towels (several)
- Car-wash soap and water
- Adhesive remover safe for automotive paint (many detailers use citrus-based removers or dedicated tar/glue removers)
Optional but useful depending on the situation:
- Isopropyl alcohol (IPA) diluted with water for final wipe-down
- Rubber eraser wheel (for stubborn decals on older paint, best with experience)
- Light polish and a foam applicator or a dual-action polisher for ghosting
A simple decision table: match the method to the sticker
If you’re deciding what to try first, this table keeps you from jumping to aggressive steps too early.
| Situation | Best first method | What usually goes wrong |
|---|---|---|
| Fresh vinyl decal (months old) | Warm + peel slowly, then adhesive remover | Peeling cold leaves glue and torn edges |
| Old, sun-baked decal | Gentle heat + plastic blade, small sections | Overheating softens clear coat, causes haze |
| Paper sticker with fibers | Soften with warm water/soap, then remover | Scrubbing grinds fibers into paint |
| Adhesive only (sticker already off) | Adhesive remover + microfiber, repeat | Using one towel spreads glue around |
| Outline/ghosting | Wash + clay (sometimes) + light polish | More solvent does nothing, frustration escalates |
Step-by-step: how to remove stickers from car paint without damage
how to remove stickers from car paint comes down to slowing the process down and keeping the surface lubricated and clean as you work.
1) Wash and dry the panel
Any dust becomes abrasive the second you start wiping. A quick wash around the sticker is enough, you don’t need a full detail.
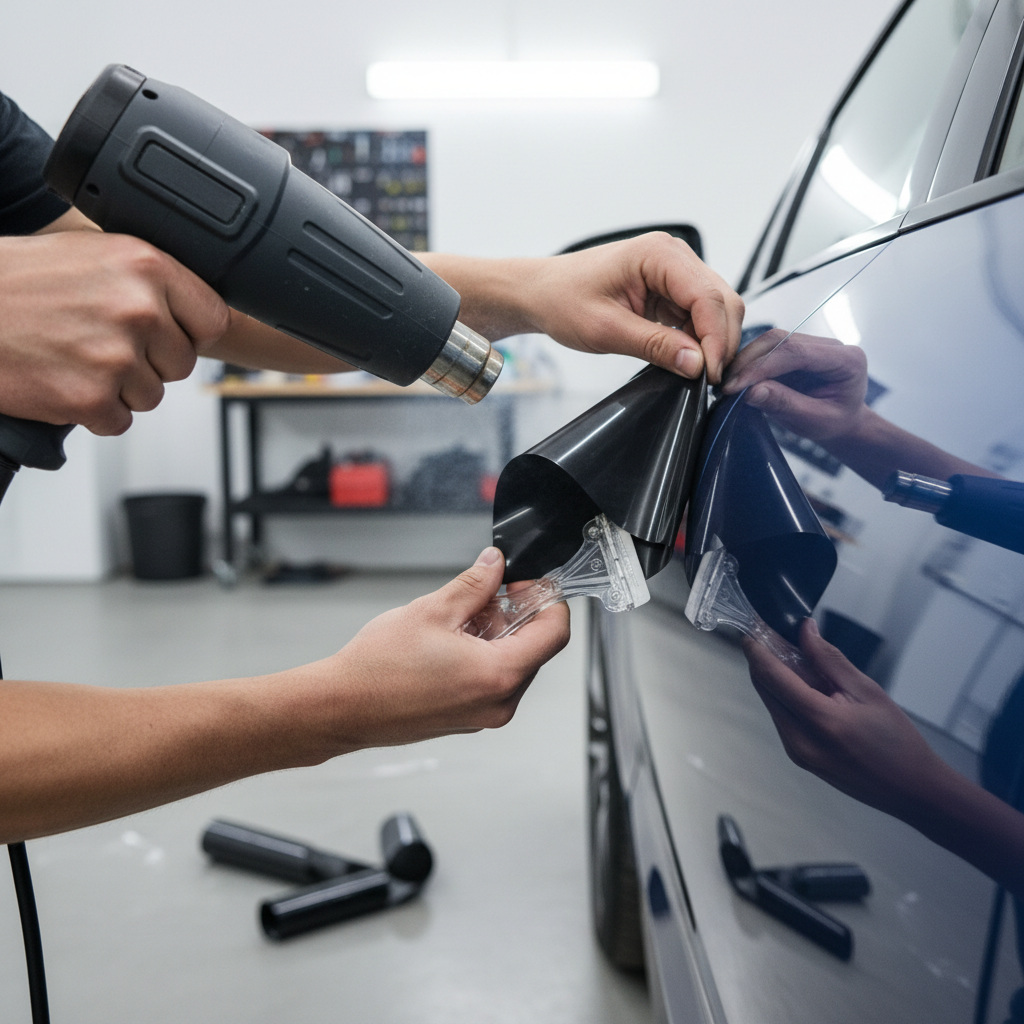
2) Warm the sticker (not the paint to “too hot”)
Use a hair dryer and keep it moving. You’re aiming for warm and pliable, not scorching. If you can’t keep your hand near the area comfortably, back off.
3) Lift an edge and peel low and slow
- Start at a corner, use a plastic razor blade if needed.
- Pull the sticker back over itself at a low angle, this reduces stress on the clear coat.
- If it tears, reheat and switch to smaller sections rather than digging at it.
4) Remove adhesive residue in controlled passes
Apply adhesive remover to a microfiber towel or directly to the residue (follow your product label), let it dwell briefly, then wipe gently. Rotate to a clean side of the towel often, otherwise you just smear glue around.
5) Wash the area again, then do a final wipe
After the glue is gone, wash that spot with car soap and water. A light IPA wipe can help remove oily remover residue so your wax or sealant bonds better, but keep it gentle and don’t soak trim.
Stubborn cases: baked-on glue, old decals, and “ghost” outlines
This is where people get impatient and cause the damage they were trying to avoid.
Baked-on adhesive that keeps coming back
- Repeat remover + dwell + wipe, two or three rounds is normal.
- Switch towels frequently, one loaded towel makes you feel stuck.
- If residue balls up, that’s a good sign, keep going gently.
Old decals that crumble
Increase heat slightly and work in small pieces. A plastic blade used flat to the surface can help shear the brittle vinyl without gouging. If you find yourself pressing harder and harder, pause and change method rather than forcing it.
Ghosting (faint outline after removal)
Ghosting often needs paint correction, which is a mild abrasive polish that levels tiny surface differences. Start with the least aggressive option: a light polish by hand, then reassess. If the car has single-stage paint or an older repaint, results vary and it’s easier to burn through, so caution matters.

Key takeaways and common mistakes (the stuff that wastes your time)
If you only remember a few things, make them these.
- Heat is your friend, but overheating is real, keep the tool moving.
- Plastic beats metal for lifting, especially on clear coat.
- Residue removal is a towel-management game, rotate and replace often.
- Don’t chase ghosting with stronger solvents, it’s often polishing, not chemistry.
Common mistakes I see in DIY attempts:
- Spraying remover everywhere, then fighting streaks and trim staining.
- Rubbing hard in one spot until the clear coat looks “cloudy” at an angle.
- Using a household glass cleaner with ammonia on tinted windows near the area, it can be a mess depending on the tint film and product.
When it’s worth calling a pro detailer or body shop
Sometimes the safest DIY move is stopping early. If any of these apply, a reputable detailer may save you money versus fixing a mistake later.
- The decal sits on fresh paint (recent repair), solvents and peeling can mark soft clear coat.
- You see cracked clear coat around the sticker, lifting can pull flakes.
- The car has matte or satin paint, many removers and polishes change the finish permanently.
- Ghosting looks like a color mismatch rather than surface residue, polishing may not fully solve it.
If you’re unsure about product compatibility, especially with older repaints or specialty finishes, it’s reasonable to ask a professional detailer for a quick assessment.
Practical aftercare: protect the spot so it doesn’t look “different” next week
Once the surface is clean, add protection so the area blends with the rest of the panel and stays easier to wash.
- Apply a wax, sealant, or ceramic spray to the cleaned section, ideally to the whole panel for uniform gloss.
- If you polished, protection matters more because you’ve removed some oxidation and exposed fresh surface.
- Give it a gentle wash a few days later, any leftover remover film usually shows up then.
Bottom line: how to remove stickers from car paint is very doable at home when you combine gentle heat, plastic tools, and a paint-safe adhesive remover, then finish with a quick protection step so the area matches.
If you want the simplest next step, set up a small “sticker removal kit” with plastic blades, microfiber towels, and a dedicated adhesive remover, then test on one small corner before you commit to the whole decal.